05 June 2011

Deck Timber DVD Rack

Our TV bench was overflowing with DVD's, so figured it was time to get a dedicated rack happening. Purchased stuff is generally pretty expensive, and I wanted "das uber rack", so whipped up something in SketchUp so I could flesh out some ideas a little. This was a rough draft to scale of something 6 ft tall, x1 DVD wide. Of course the bottom DVD's would probably suffer a fair bit of weight.


The deck out back was rebuilt last summer, and I ended up with a load of the unused timber from the original tear-down. So I went and had a look at my scrap timber to see what I could do.


A few shelves cut up, and some MONSTER slabs of timber for feet.


I shaved the feet down into gigantic "ducks feet". They should support 6 feet of DVD's no problemo.


Decided to be lazy and screw everything together instead of getting fancy with inset joints etc. At this point I decided I might have gone overboard with the size of the feet.


Original single-stack prototype finished. Seems ok.


I used this in the house for a week before deciding to rework it. 1) It only held half of our DVD's. 2) Wasn't quite happy with the over sized feet.
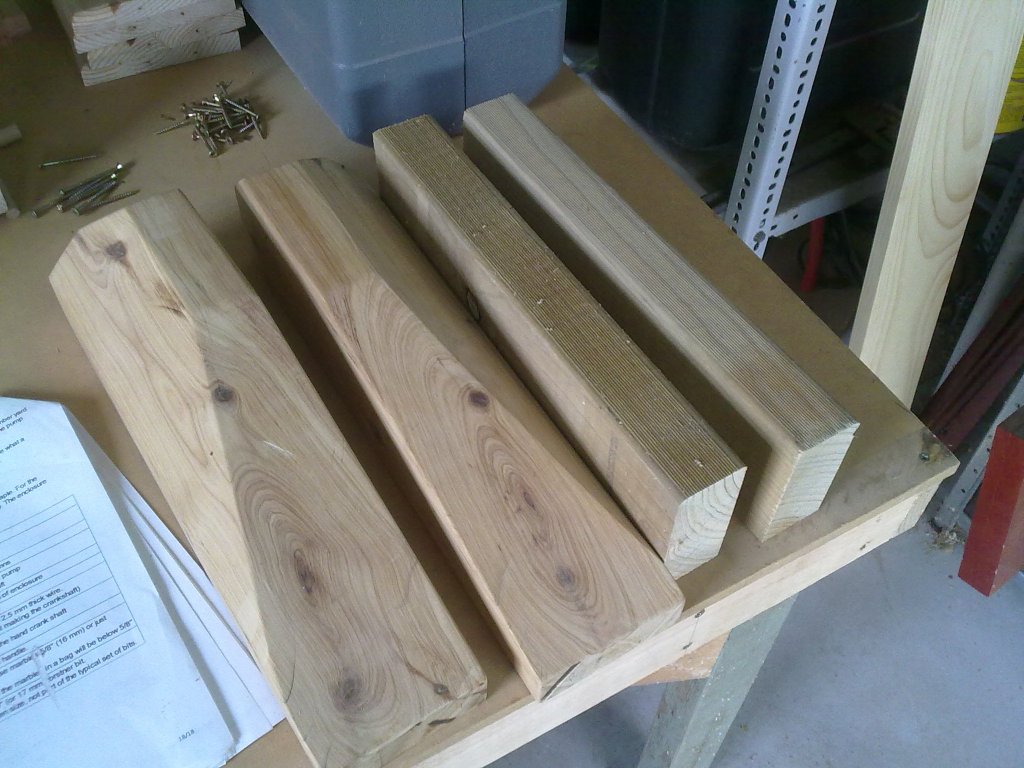

I switched out the huge duck feet for a lesser gauge timber. I shaved these down in a similar fashion to the originals.


Decided to go double-width, so created some wider shelves. I'm hogging out slots for the center spar here.


Double width shelf. Pre-drilling.


Routed edges vs. hand chiseled slots. Think I'll go with the routed edges. A router makes completely amateur work look pro.


Just getting a feel for what it'll look like with the new width and feet.


Center spar goes in.


I only had a few pieces of 6ft length which I used on the original single-width test rack. So I had to butt-joint a few pieces end to end for the two new uprights.


End-to-End joints are generally pretty weak. But I think after the glue dries this will be as good as it gets. These came out looking pretty good after a sanding. I kinda like big heavy dowel joints which are visible right through. edit: yeah I know their orientation is wrong. The other length I did was fine...not sure how I screwed this one up...oops.


Took a photo thinking I was done. Oops forgot the back rests.


As always I've over-engineered again. You could park a truck on this. There's 50 x 60mm screws in this thing. (There is actually fifty)


OK finished now. Eh it came out ok. I'll stain the pine with dark mahogany later, and probably give it a matt/satin varnish. Possibly even oil it. Maybe next week ;-)

What's really cool in this pic is the red of the rack decking timber vs. the actual deck in the background. The deck re-used all the timber from the tear-down, and I kept the stuff that was too short for the new orientation. It is actually the same stuff, same age, and both weathered the same. Only difference is sanding.

04 June 2011

Magnet Phone

I wanted to attach my phone/GPS to the bike without the headache of a proper bracket. I'd tried a few magnetic gizmos in the past that I'd made with those flexible flat fridge magnets, but wasn't happy with their strength, or scratching, or they were just too poxy to use. But today I remembered I had a pile of very slim rare earth magnets from a series of Hard Drives that I'd pulled apart in the past.


So whack a pair of these inside the gel-case of my phone...and you can see where this is going. No adhesive necessary.


So easy. Can't believe I didn't think of this before.


Went to a mates house the other day with this setup and it worked fine. The phone didn't bounce, shift, move, anything. GPS worked fine.

I had small concerns about magnetic interference but the more I thought about it the more I realised that a static field wont effect the functionality this phone uses, both for 3G nor satellite location. If there were a pulsing electromagnetic field going on in very close proximity, then it would certainly have troubles. Even then, it may only be at certain harmonic frequencies that could cause problems, or of a strength high enough to actually cause current flow problems in the phone circuitry itself. Not something these magnets are going to achieve.

As it is, I'm very happy with it. Super simple, super easy to use, completely non invasive. Pure win!!

Extra Power

I bought a mobile GPS for the motorcycle a year or 2 back, and really haven't used it since I got my new(er) phone which has a better embedded gps. This portable unit is waterproof, and transmits driver instructions on the FM band. There was a small receiver which you'd mount to your helmet etc. Overall it was a great unit, except the battery was complete rubbish, with virtually zero lifespan. It just wasn't functional without supplied power from the mount-bracket which was wired to the bike battery.

So I decided to add my own power source so the kids could use it when we go geocaching.


So many screws between me and getting this thing apart. It was built like a brick with nice solid rubber bushings for every component, and metal brackets compressing everything together.


Finally cracked it open. (this is an out of sequence photo, but you get the idea)


COMPLETE RUBBISH BATTERY!! 1000 milli Amp Hours. That's functional for MINUTES, maybe an hour when running a backlit LCD and Windows CE with the GPS application and receiver running. The spec is fine if the unit is idle...but worthless when in use while portable.


So I made my own battery pack. I couldn't find a triple-AA pack at Jaycar, so grabbed 3x1's and stuck them together with hot-glue on a small aluminium plate I cut out of an old computer CD enclosure. ;-)


Hot glued the battery pack assembly to the back 1/2 of the GPS unit.


...and fed the wires through a small hole I drilled through earlier. I then re-soldered and heat-shrunk the original battery plug


At this point the very straight forward job was done. Put it all back together and VIOLA, 7500mAh battery pack (standard rechargeable batteries are 2500mAh/ea), and go have some fun with the kids.

However...during the process I either nicked, pinched, shorted-out, or otherwise destroyed the LCD screen. I was certain the unit was "booting" because I saw it flicker once, and small debugging LCD's on the PCB indicated it was working in its on/off/sleep states. I was VERY VERY angry at myself. This was a really straight forward job. Simple in every possible way. I was having a rare moment of actual...happiness...listening to music as I did this. Then **BLAM** you broke your $200 toy. Idiot.

So I'm pretty angry now. I walk up and down the hallway eating cookies by the hand full, then order a pizza to drown my sorrows in its pure awesomeness. /dramatic-effect.

I figure there's no way I can reasonably expect to replace the LCD. During a post-op inspection, I actually make things WORSE by shattering the glass screen that the touch-digitiser is adhered to (this is a second component, not the LCD itself)

Wow...I'm on fire.

In a fit of desperation I get the magnifier on the part/s, and write down their bazzilion-digit part numbers and try to find them online. I was really surprised to find them indexed on Google at all. Even better, a few places were selling them wholesale to importers from China, but only in orders of 5 or more. As I dig some more, it turns out the parts used in this GPS are actually really common Gizmologist project components, but I still can't find a source for single units.

Ebay? Wow some dude is selling them!!...from China. I ask him if he's selling the touch-screen as well. But replies he doesn't. Oddly, I find another seller with the touch-screen...but he doesn't have the LCD. So I order both (cost me ~$40 total) and put the whole project on hold for 10 days while I wait for shipping from both guys.

And they arrive on the same day!! In the same boxes...with the same labels. And the same return address? I guess they were both drop-shipping. Oh well, can't really complain, I got the parts!!!


I plug in the new parts, and I see light :-D Very very happy now. So glad I didn't destroy the little computer unit. Running on USB power at this point.


MY first test with the new battery pack as source power. Works fine, as it should ;-)


The unit doesn't have a speaker, but as mentioned earlier it does transmit audio via FM. There is actually a little speaker-out port on the PCB, so I decided to test it out. Unfortunately I didn't really have any lower-power piezo speakers to test it with, nor an oscilloscope to properly test the port. So I gave up on that (for now).

In this picture you can clearly see the speaker port just down-right from the battery-port. Same style plug. The FM antennae can be seen top left near the black alligator clip, connected by a short piece of grey wire. The SD card is standard SD, not micro/mini.

I'm just simply amased that in this day and age it's cheaper to produce this kind of product with an off-the-shelf mobile computer PCB, with shelf display parts, to run an essentially dedicated GPS unit as an application within Windows CE, rather than as a static firmware circuit. All for $200 bucks at a grocery chain!! (Aldi) I've played around with WinCE on this unit when I originally got it. I'm boggled by how powerful this 7yr old operating system is, and I still wonder how Apple is in 2011 able to get any market share with their i-products. I'm running a GPS "app" on this unit, I can web browse (albeit really hard with this actual unit due to limited input plugs...not part of its sale-design), watch videos, slide-show photos, listen to music etc from this 2004 operating system. The original iPhone was a 2007 release and "swept the world" with what was really just "off the shelf technology". Try and keep up guys ;-)

So anyway. Basic job complete. This puppy has "UNLIMITED POWA' " for the kids now :-D


23 May 2011

My first "favorite" Geo Cache

On the geocaching.com site, you can "favorite" one cache, for every 10 that you find. I certainly found my first favorite today. This was a 1.5(easy to find) / 1.5 (easy terrain) cache. But it's the clever ones that you'll always remember.


Errmm...that's a sprinkler right?


"This sausage looks very suspicious !!" I actually did this one on my round today, hence the glove. Yes I was geocaching "on the job". What a life. This was the SECOND time I came back here today. I couldn't find it the first. Rode off...had a think about it, and came back later. Couldn't let that little sucker beat me ;-)


"Official Geocache" I've edited the location label out.


At first I thought this might have been a pre-fab "to look like a sprinkler" cache, but these look like standard parts from Bunnings. The finders-log is rolled around a piece of coat hanger for easy handling. Another homage to the pure awesome of real wire coat hangers.

So in summary: Geocaching is really fun. Mildly addictive. Offers micro rewards. Had a range of difficulty settings. It includes all the elements of a great online game, 'cept you're getting your vitamin D and exercise out in the sun!! Git ooot' thar 'n have ye sum fun!! ;-)

14 May 2011

My 1st GeoCache

I FINALLY went and did my first GeoCache. Given that I'd consider myself a bit of a techno-monkey and gizmologist, it's a little embarrassing that I'm so slow to the party. I've even had a GPS for a couple years now, and more recently on my phone.

There are LOADS of geocache listing sites on the net. I had a bit of a dig around, and it seems that geocaching.com is undoubtedly the largest site, with a number of GPS and phoneGPS apps that run with accounts linked to that site. It made sense to start there.

So I went and grabbed the phone app for my phone. You can use GroundSpeak, or Trimble's GeoCache Navigator. (there are others, the geocaching.com API is public) I'm on a Symbian phone so went with GeoCache Navigator. These apps actually tie in to your geocaching.com account. Very cool, but YOU DON'T NEED THESE APPS. You could just get the GPS locations from any site, and then go find the cache with whatever GPS you use. The apps are just cool tie-ins so you can use less of your brain getting (auto-send coords to your phone), and finding the caches (follow the arrow!!) :-D

So, from geocaching.com I did a search for close cache locations, and decided to go find a traditional one classed as 'easy' about 300 meters from my house!! You can scroll down the page on that link and see my log entry as "Mashee". :)

***Spoilers for this cache below. Unlikely that anyone I know will do this one anyhow****

The "clue" said look up, so I figure it's up in those trees somewhere.


Hmm, nope, this location is closer, and seems a more logical public spot. Etiquette dictates you scurry around for your cache covertly, not revealing its location to non-participants. A quick look around, and all is clear. Nobody around. Lets see if I can find this thing!! Looking up...yup, I can see something up in the framework!!


Got it!! This was very cool. Great choice of container, and a list of previous cachers have signed in. I entered my "FIRST ENTRY!!" notation, folded the log back into the mint container, and put it back where I found it :)

This was truckloads of fun. Doing this with a friend, or group would be awesome. You could easily make a great day out of this. I'm off to log a pile of these into the phone so I can pick a few more off as I drive around the local area when out shopping or coming home from work etc. Any kind of day-trip will prove extra fun with a few of these logged to find. The kids will go nuts doing this too. Can't wait!!!

notes: I've posted a pic of the actual location and container for this cache location here on my blog, but as a general rule you wouldn't do this on your geocaching.com account. Be discrete with images and keep it fun for other cachers etc.

additional notes: I bought Geocache Navigator from the nokia ovi store, not from the navigator site itself. I figured it would be easier to re-download the app in future from a site I've already got an account with. I'd suggest using your respective iPhone or Android store to do the same. This was a full-blown app that tied into geocaching.com's API, not simply a glorified HTML page, so I had no reservations about actually paying money for it. A rarity for "apps"

Some more pics from the following days.

Found my first trackable coin! Its travels are registered here. Found it at the Freeway Triple cache. Currently in my possession till I drop it in another cache.


Many, many trees. Most with great hiding spots. It was a total fluke I found this one.

Full Log!!

24 February 2011

Gaming: about time we applied it

There have been years and years of studies and research links to indicate HUGE global reduction in various types of crime ever since the release of Doom-1. It's sickening to still hear weak fanatical media trying to blame individual and isolated events on game violence, when in fact the very opposite is true.

So this video goes a step further, to hypothesize and implement systems to utilise gaming as a means of super-collaboration for real world problems. It really outlines the mindset needed to turn around the "gamers are wasting their time" chant, into something nobody can deny as truly powerful. 20mins, but not boring by any measure.


http://www.ted.com/talks/jane_mcgonigal_gaming_can_make_a_better_world.html


This pretty much vindicates points of view I've been trying to explain to peers since I started at Post. My "spare time" is actually time I spend doing awesome stuff for my kids and peers via my skill set. Electronics fix it jobs, computer fix it jobs, handyman junk, toys and furniture for myself and my kids etc. You've seen some of it in this blog throughout the years. As much as I may sound like I'm miserable and ranting, I'm actually trying to get friends to enjoy what they're missing out on. Actual real world productivity that forms many seeds of growth within the circle of friends, which seeds a larger circle. Not just "busy work" in the form of achieving pretend housework goals.

Another example of real world gaming for global interests is the Folding-At-Home "Fold It" endeavour which I've been part of for years. Fold-It is a recent implementation of the folding@home goal that gets you to fold proteins with a purely human visual intuition means. The results are staggering against computational-brute-force, which the F@H team have been doing for years. edit: Actually I think FoldIt may now be independent of the original F@H from Stanford. I'm certain it was originally linked though I can't find the common person any longer. It's been a few years since it launched.

Give it a shot. It's fun, you inherently learn HEAPS through sheer curiosity, and it creates topics of conversation and competition that's genuinely fun amongst your peers and friends who are doing the same thing. Plenty of these style games around, go look. Give it a shot. Play some games.

A little extra from one of Janes older workshops:
http://vimeo.com/16227360 A lot of tongue in cheek, some of the same stuff is covered, but some great elaboration also. Bit of fun. LOL @ the Massively Multiplayer Thumb Wrestle Wars at the end :-)

Jane McGonigal homepage:
http://janemcgonigal.com/

11 February 2011

Power Supply

I had a few old ATX power supplies laying around from a few PC's that ended up on the road side. Jordy is doing an electronics course this year, so figured he could do with a good lab power supply to juice up any gizmos he may construct throughout the year. Computer power supplies have a great range of DC voltage outputs, as well as a safe and solid circuit base to build on. Gizmologists can find instructions all over the net on the ATX specs, and what each output wire is for etc...


Crack it open and give it a good clean, they're always full of dust bunnies.


Cut off all the molex and ATX connectors. Almost every wire will be used. Simply sort them neatly into their color-groups after cutting the ends off.


HELPING HANDS!!! I finally bought myself one, after spending my entire youth asking for one each Christmas!! Every gizmologist needs one. Sort the colors out, and solder them together in groups. I only used 2 of each (for +3,5,12volts) as I don't expect more than an a couple amps for any given project he works on. More than that and he's probably going to blow his circuit before these heavy wires melt anyhow.


Crimp some terminals on where possible. (or solder) Drill holes in the case where appropriate, making sure none of your terminals will contact the power supply innards.


Nice n tidy.


Almost done, just going to put some LED's, a toggle switch and push switch, and all done. The switches and LEDs are just extra, not really needed. The power supply has an 240V on/off anyhow. I'm just putting in the soft-on switch driven by the power supply circuit itself. It could have been soldered always-on.


Finished Product!! The original specs sticker remains in place so he's aware of each rails amperage limitations. I've got a nice big 10mm Green LED in top left to show 240V input is LIVE. (STANDBY - outputs can be off though). A big red LED at the bottom denotes that his DC outputs are HOT if he's got it switched ON, or using the push-button. Pretty Spiffy!! Making one for myself now from the other spare supply :)

23 January 2011

Marble Pump

A quick and dirty look at the marble pump in action on its own. I'm no cinematographer so you'll have to live with the phone-cam quality and text narration.

It's staggeringly hard to get 17mm drill bits (regular, spade, or forstner), and the same for router bits in Australia. I gave up and went with 18mm bits, despite the fact that marbles are 15-16mm.

The pump shown here is a little "loosey-goosey" as it was my 1st build. The others are a little leaner in action.

Great little gizmo anyhow.

************ EDIT *************
For some reason the Youtube Captions are intermittent. If you don't see captions then this will be duller than expected, trying to fix the problem. Try again later
*******************************